[Image from google]
Hey everyone this posts will be my first gift guide for the season. I think men are relatively easy to shop for but some people may disagree so i'm posting this to hopefully help you all out!
Body Care:

[Image from sephora]
This is the Jack Black Jet Set Traveler Set. This gift is great for any man to receive, it is a travel size so they can try it out without having to commit to it. You can get this a Sephora for $25.00.

[image from Sephora]
Got a man who likes to smell nice but is super indecisive? This gift set is perfectly good for him, it comes with twelve deluxe fragrance samples so they can try each one without having to commit. Then it also comes with a gift certificate for one full size of any of the samples so when they find one they like they can get it for free. You can get this at Sephora for $50.00.

[Image from Sephora]
Got a man who hate having a ton of different products to have to use this is perfect for them. It is a 2 in 1 shampoo and body wash in a super musky manly scent that every man should love. You can get this at Bath and Body Works for $11.00 [but they are always having sales!]
Video Games: Got a guy who loves games but you have no idea which ones are worth buying well here are some that defiantly are!
[Image from Google]
Does your man love games with swords and mythical creatures such as Dragons? This game is perfect for him, Skyrim is a role playing action game which has all of those things. It has something to do at every point such as battles, fighting dragons and other animals and just exploring the massive map the game has. You can get this at Game Stop for $58.00 [this game works on Windows, Xbox 360 and Playstation 3 consoles]

[Image from Google]
Your guy love games with lots of shooting and maybe some zombies then this is the game for them. This game comes with many different kinds of artillery and map options. It also comes with a zombie mode where you can mow down zombies on many different maps. This is great for any guy likes a good shooting game. You can get this at Game Stop for $49.99[ This game works on Windows, Xbox 360, Playstation 3 and Wii U]

[Image from Google]
Got a guy who loves video games and also loves the old west then this game is perfect for them. This game includes old west themes, gun play, horse riding and best of all a zombie mode option. You can get this from Game Stop for $30.00[ works on xbox 360 and playstation3]
Stocking Stuffers:
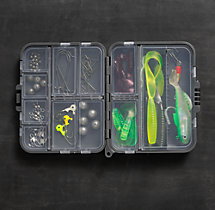
[Image from Restoration Hardware]
Got a fisherman in the family this Tackle Box and Accessories Set would be a great gift for them. Sold at Restoration Hardware for $14.99.
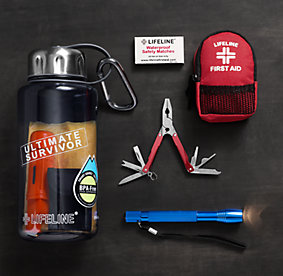
[Image from Restoration Hardware]
Got a outdoorsman in them family? This Survivor Kit in a Water Bottle would be perfect for them. It includes a BPA free water bottle, flashlight, whistle/compass, blanket, poncho, first aid kit and more! Sold at Restoration Hardware for $24.49.
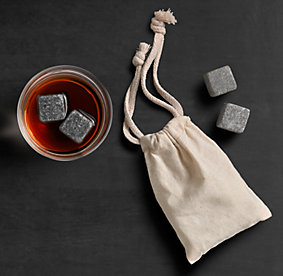
[Image from Restoration Hardware]
Have a drink enthusiast in the family these Whiskey Stones are great because they won't water down their beverage. Sold at Restoration Hardware for $17.00.
Products Mentioned:
Jack Black Travel Set; $25.00; Click Here
Fragrance Sample Set; $50.00; Click Here
Ocean 2 in 1; $11.00; Click Here
The Elder Scrolls V Skyrim; $59.99; Click Here
Call of Duty Black Ops II; $49.99; Click Here
Red Dead Redemption Game of The Year Edition; $29.99; Click Here
Tackle Box and Accessories; $14.99; Click Here
Survivor Kit in a Water Bottle; $24.49; Click Here
Whiskey Stones; $17.00; Click Here